 Save
Save I'll never forget the year I decided to transform a simple cream cheese dip into something spooky for my niece's Halloween party. She was convinced that "boring grown-up appetizers" had no place at a kids' celebration, so I challenged myself right there in the kitchen to prove her wrong. Within twenty minutes, I'd shaped a creamy white skull with vegetable bones that made her gasp—and suddenly, she was guarding that platter like it held actual treasure. That moment taught me that the most memorable appetizers aren't always about complicated techniques; they're about bringing a little playful magic to the table.
I remember my friend texted me thirty minutes before her Halloween gathering to ask if I could bring something spooky. I pulled together this skull using whatever vegetables I had in my crisper drawer, and it became the talk of the party—not because it was complicated, but because people were genuinely delighted by the playful presentation. From that night on, it's been my secret weapon for any autumn celebration.
Ingredients
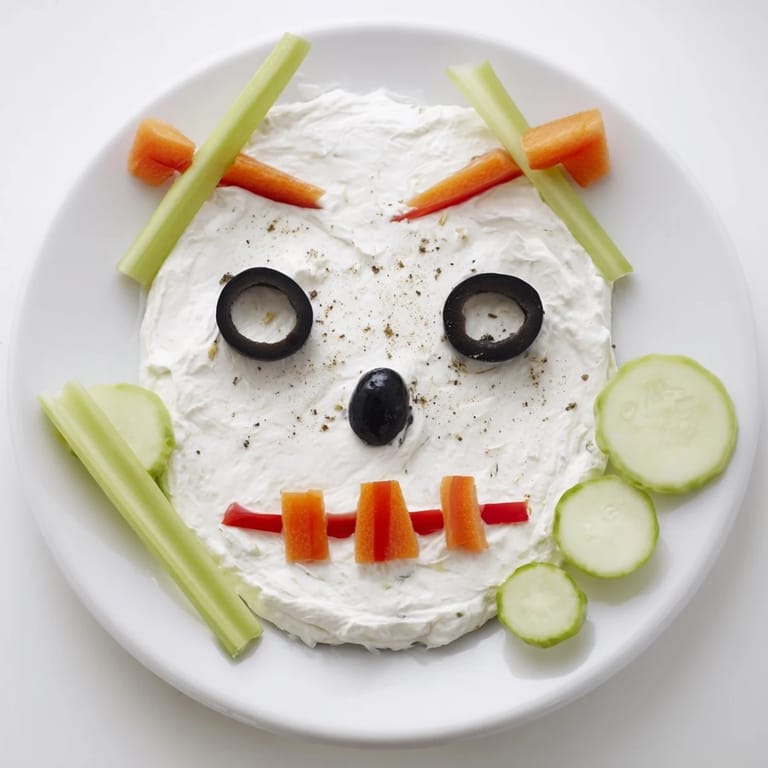
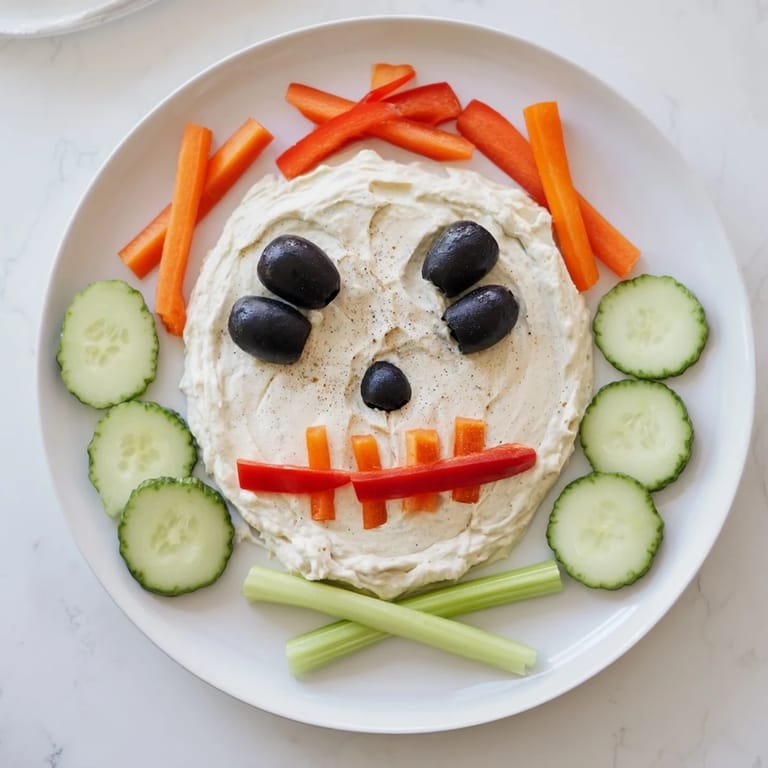
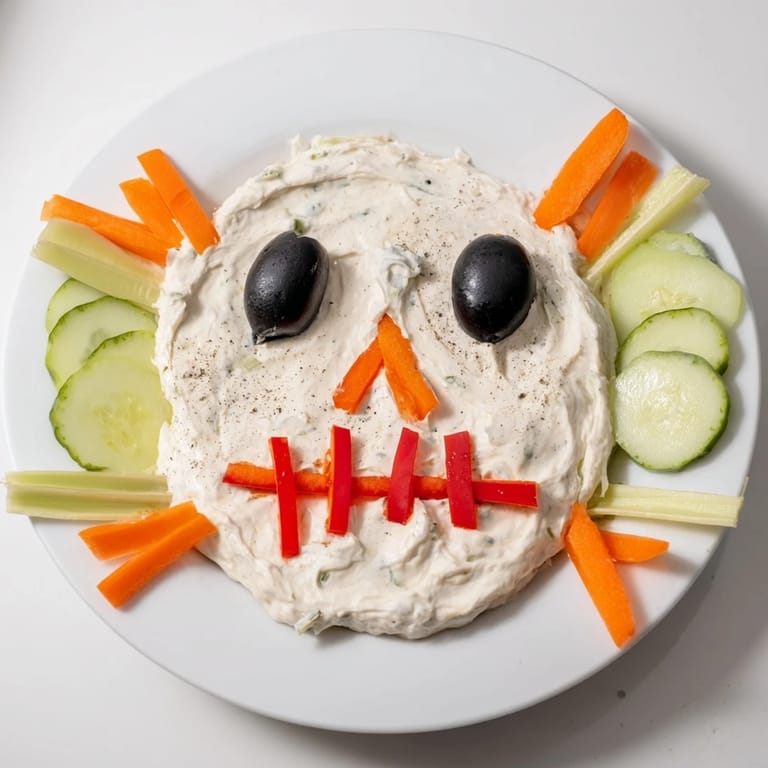
- Cream cheese (8 oz), softened: This is your blank canvas—make sure it's truly softened to room temperature so it spreads like butter and holds its shape beautifully without any lumps
- Sour cream (2 tbsp): The secret player that keeps your spread from being too thick, adding a subtle tang that makes people keep coming back for one more bite without quite knowing why
- Garlic powder (1 tsp): The quiet hero that transforms plain cream cheese into something with actual personality and depth
- Lemon juice (1 tsp): A squeeze of brightness that keeps the whole thing from feeling heavy and ties all the flavors together like a little bow
- Salt and pepper, to taste: Always season generously at the end—your taste buds will thank you, and guests will taste the difference between "nice" and "where did you get this recipe"
- Cucumber rounds: Crisp and cool, these become the decorative cheekbones and add a fresh contrast to the creamy base
- Red bell pepper strips: Sweet, crunchy, and naturally beautiful—perfect for creating that sinister smile and adding a pop of color
- Black olives, halved: Your skull's haunting gaze—I always buy good ones because their darkness really makes the eyes pop
- Carrot rounds and pieces: Double duty as teeth and nose; their natural sweetness and bright color are what make the skull feel finished rather than abstract
- Celery sticks or breadsticks (2–4 long pieces): These become your crossbones—celery stays fresh and crunchy, but breadsticks add a fun twist and something else to dip into the spread
- Fresh parsley or chives (optional): A gentle green garnish that adds an earthy finishing touch and makes the whole presentation feel intentional
Tired of Takeout? 🥡
Get 10 meals you can make faster than delivery arrives. Seriously.
One email. No spam. Unsubscribe anytime.
Instructions
- Blend your base:
- In a mixing bowl, combine the softened cream cheese, sour cream, garlic powder, lemon juice, salt, and pepper. Stir slowly at first—you want to feel the cream cheese surrendering gradually until everything is smooth and spreadable. Don't rush this; rough streaks will show in your final skull, and you want it looking intentional.
- Shape your skull:
- On a large serving platter, use a spatula to spread and sculpt the cream cheese into an oval skull shape. Think of it like you're molding clay—smooth the surface with gentle pressure, making the top slightly rounded like an actual skull would be. Step back often to check your proportions; this is where the magic happens.
- Add the crossbones:
- Place your celery sticks or breadsticks diagonally underneath and slightly overlapping at the center of the skull's bottom, creating that classic skull-and-crossbones X shape. They should look intentional, not haphazard.
- Create the face:
- This is where you lean into the spooky fun—position your black olive halves as wide-eyed sockets, add a carrot or olive slice for a small nose, and arrange red bell pepper strips into a wicked grin. Use carrot rounds as teeth along the mouth line. Work slowly and step back frequently to see how it reads from across the room.
- Add the finishing touches:
- Scatter additional cucumber slices, carrot pieces, and other vegetable decorations around the skull to add dimension and color. Sprinkle fresh parsley or chives delicately across the creation if you'd like that green accent. This is your chance to make it feel like your own creation.
- Chill and serve:
- Refrigerate until party time. Serve surrounded by crackers, vegetable dippers, or pita chips so people can enjoy both the creamy spread and the sculptural moment of peeling away the vegetables to uncover the dip beneath.
 Save
Save The moment I saw my seven-year-old nephew carefully pick off an olive eye to eat with his cracker, then show his friends how the skull was made, I realized this recipe had crossed from "appetizer" into "experience." It became less about the dip and more about the conversation starter, the moment of surprise, and the joy of food that asks you to engage with it playfully.
Making It Your Own
This skull doesn't have to look exactly like mine—in fact, the best versions are the ones where you bring your own creative energy. I've seen people arrange vegetables into different expressions, use sun-dried tomatoes for a more dramatic look, or even carve out the eye sockets deeper to make them more haunting. The spread is just the foundation; the vegetables are your artistic medium. Don't overthink it—a slightly lopsided skull with genuine character beats a perfectly symmetrical one every time.
The Vegetable Dip Evolution
I started making cream cheese dips years ago as a way to use up odds and ends from the vegetable drawer, but I never realized how much personality you could inject into something so simple. This skull taught me that presentation isn't superficial—it changes how people experience food emotionally. A dip is just a dip, but a dip shaped like a skull? That's a story you tell at the table.
Party Day Prep and Serving Tips
The beauty of this recipe is its forgiving nature. You can assemble the skull up to four hours ahead and keep it chilled, covered loosely with plastic wrap. The vegetables stay fresh, the spread holds its shape, and you get to feel calm and collected instead of frantic as guests arrive. I always keep extra vegetables nearby for touch-ups—an olive that shifted during transport takes thirty seconds to reposition, and nobody ever notices.
- For a gluten-free version, use only celery sticks for the crossbones since some breadsticks contain hidden gluten
- If you want extra flavor depth, mix herbed cream cheese or fold in chopped fresh chives into the base spread instead of relying on garlic powder alone
- Surround the skull with an assortment of dippers—crackers, pita chips, carrot sticks, and bell pepper slices—so guests have options that match the mood
 Save
Save This skull and bones spread has become my annual October contribution, the appetizer people specifically ask me to bring. It's a quiet reminder that the most meaningful dishes aren't always the most complicated—sometimes they're just the ones made with a little playfulness and heart.
Recipe FAQs
- → How is the creamy base made?
The creamy base blends softened cream cheese with sour cream, garlic powder, lemon juice, salt, and pepper for a smooth, tangy flavor.
- → Which vegetables are used for decoration?
Slices of cucumber, red bell pepper strips, black olives, carrot rounds, and celery sticks create the skull's features and crossbones.
- → Can this be made gluten-free?
Yes, using celery sticks instead of breadsticks ensures a gluten-free version of this spread.
- → What are suggested serving options?
Serve chilled with assorted crackers, pita chips, or additional vegetable dippers for variety.
- → How long does preparation take?
The entire preparation is quick, typically about 20 minutes, with no cooking required.