 Save
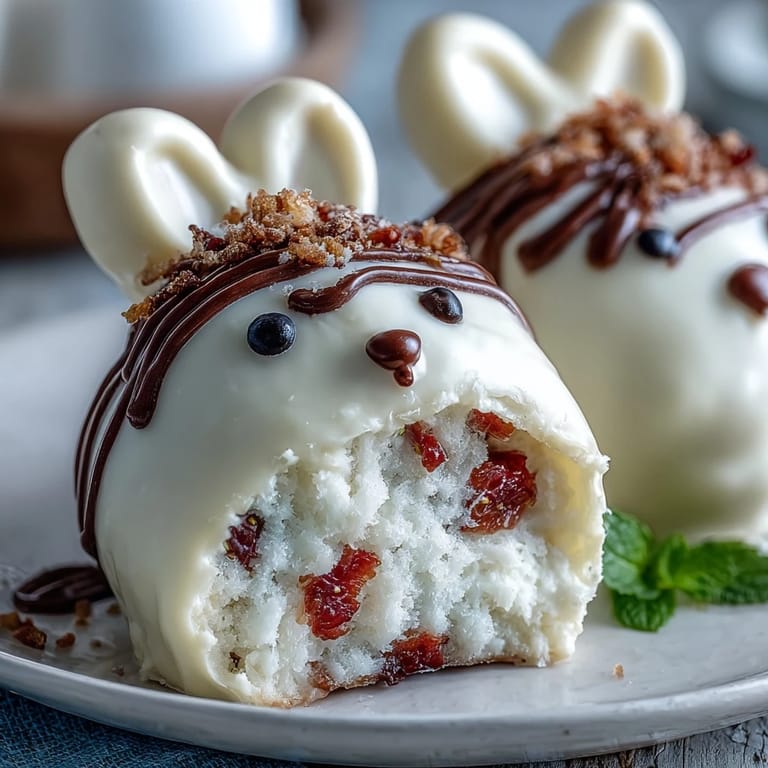
Save My daughter came home from school with a bunny craft project and wouldn't stop talking about Easter baskets that evening. While she worked on her coloring, I found myself scrolling through party ideas, and suddenly there it was—the image of a strawberry bunny that made me smile so hard I had to make them that weekend. The kitchen filled with the sound of her tiny voice asking if we could make something she'd actually eat, and I realized these little treats were exactly what I'd been searching for without knowing it.
I brought these to an Easter brunch last spring, and watching a group of grown adults carefully pick them up like they were tiny treasures—turning them over to admire the details before eating them—was worth every tiny marshmallow ear I'd shaped. One woman asked for the recipe right there, chocolate on her fingertip, which told me everything about how these little bunnies had landed just right.
Ingredients
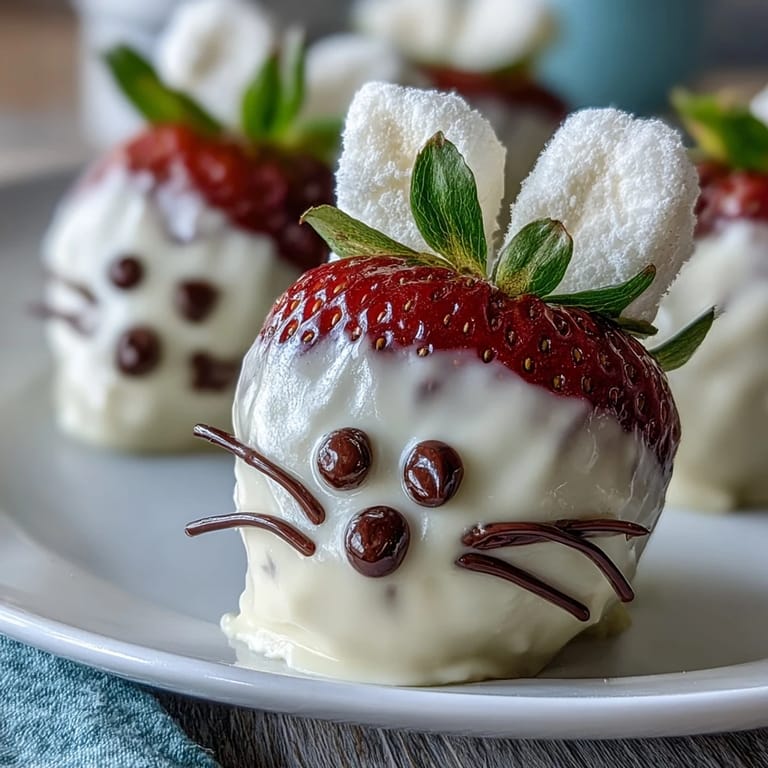
- Large Fresh Strawberries: Choose firm ones with a gentle point at the tip, as this becomes your bunny's face; softer berries will weep and lose their structure, so skip any that feel mushy.
- White Chocolate: Use quality chocolate that actually contains cocoa butter, not that waxy stuff that won't set smoothly; it's worth the extra dollar or two because cheap chocolate looks dull and tastes like regret.
- Dark Chocolate for Drizzle: A contrast of dark against the white coating is what makes these visually pop, and honestly, a little bittersweet edge prevents them from feeling too sweet.
- Mini Marshmallows for Ears: These soften quickly and stick beautifully to warm chocolate if you work fast, but if they start sliding around, chill the strawberries for five minutes and try again.
- Edible Pink Food Gel or Pink Candy Melts: The gel stays put better than melts, and a tiny dab is all you need; if you go heavy-handed, your bunnies look clownish rather than cute.
- Candy Eyes or Mini Chocolate Chips: I prefer the little black candy eyes because they give instant personality, but chocolate chips work and actually taste better if someone bites into the face.
Tired of Takeout? 🥡
Get 10 meals you can make faster than delivery arrives. Seriously.
One email. No spam. Unsubscribe anytime.
Instructions
- Set Up Your Workspace:
- Line your baking sheet with parchment paper and wash those strawberries thoroughly, then pat them completely dry with a clean kitchen towel because any moisture will cause the chocolate to slip right off like a tiny strawberry slip-n-slide. This part feels tedious but it's the difference between bunnies that stick and bunnies that become a chocolate puddle on your serving plate.
- Melt the White Chocolate:
- Use a double boiler if you want to feel like a real baker, or just microwave in 30-second bursts and stir between each one; the second method is honestly faster and gives you better control if you're working with kids or while chatting on the phone. Smooth, glossy chocolate is what you're after, not grainy or scorched.
- Dip and Coat:
- Grab each strawberry by the leafy end and dunk it into the white chocolate, twisting gently to coat all sides and letting the excess drip back into the bowl before setting it on your parchment paper. This is meditative work, the kind that makes you feel like you're doing something special even though it's essentially dunking fruit.
- Add Those Adorable Ears:
- While the chocolate is still soft and sticky, cut each marshmallow in half and press two halves into the top of each strawberry to form ears, positioning them so they angle slightly outward like a real bunny. Work quickly because once the chocolate starts setting, you'll be wrestling with the marshmallows instead of gently placing them.
- Paint the Details:
- Use a toothpick to add the tiniest dot of pink gel in the center of each marshmallow ear for that inner-ear look, then add a small pink nose at the tip of the strawberry. This is where the bunnies go from cute to completely irresistible, so take your time and enjoy the absurd cuteness of what you're creating.
- Apply the Eyes:
- Press a candy eye or mini chocolate chip on each side of the strawberry's point to form eyes; they should sit roughly where eyes would naturally go, which sounds obvious but matters more than you'd think for making these feel alive.
- Drizzle with Dark Chocolate:
- Melt your dark chocolate the same way you did the white, then transfer it to a piping bag or just use a fork to drizzle artistic whiskers and a little smile across each bunny. This is your chance to give each one personality, so have fun with it.
- Chill and Serve:
- Pop them in the fridge for 10 to 15 minutes so everything sets properly, then arrange them on a platter and watch people's faces light up when they see them. They're best served cold, and they'll keep for a few hours if you cover them loosely.
 Save
Save There's something about making food that's as fun to look at as it is to eat that reminds you why you started cooking in the first place. These little bunnies took my daughter's Easter from nice to absolutely unforgettable, and that's the kind of magic worth keeping close.
Storage and Make-Ahead Tips
You can prepare these the morning of your gathering and store them in an airtight container in the fridge for up to 8 hours, which means you're not scrambling last-minute while also serving food. The chocolate stays set and the marshmallows don't get weird as long as you keep them cool, so they're actually perfect for advance planning.
Variations Worth Trying
Once you nail the basic bunny, you'll start seeing possibilities everywhere—dark chocolate-coated versions with white ears feel fancy and sophisticated, and dipping them in milk chocolate gives you a more classic Easter-candy vibe. I've also seen people use pretzel sticks for whiskers, which adds a salty-sweet moment that honestly shouldn't work but absolutely does.
Making This Work for Everyone
The beautiful part about these bunnies is how easily they adapt to different diets and preferences without losing their charm. Swap dairy-free chocolate and vegan marshmallows and nobody would ever know the difference, and for anyone with allergies, you can skip the eyes entirely and just use small dots of colored gel instead. The whole point is celebrating together, so don't hesitate to make adjustments that keep everyone at the table happy.
- Always check chocolate labels for soy and nut warnings if you're serving a crowd with allergies, as different brands have wildly different processing standards.
- If you're making these for younger kids, let them help with the decorating and watch how the simple act of adding eyes brings pure joy to their faces.
- Remember that imperfect bunnies taste just as good as perfect ones and somehow feel more genuine.
 Save
Save These strawberry bunnies prove that the best dishes aren't the most complicated—they're the ones that make people smile. Make them, share them, and trust that simple things done with care are always enough.
Recipe FAQs
- → How do I prevent strawberries from getting soggy?
Ensure strawberries are thoroughly dried after washing to keep the white chocolate coating firm and prevent sogginess.
- → Can I use vegan chocolate and marshmallows?
Yes, substituting dairy-free chocolate and vegan marshmallows will maintain the texture and appearance while fitting dietary needs.
- → What’s the best method to melt white chocolate?
Use a double boiler or microwave in short bursts, stirring frequently to avoid burning and achieve a smooth melt.
- → How do I attach the marshmallow ears securely?
Place marshmallow halves on the soft white chocolate before it sets so they adhere firmly as it hardens.
- → How should I drizzle the dark chocolate?
Melt dark chocolate smoothly, then drizzle with a fork or piping bag for delicate whiskers and mouth details.