 Save
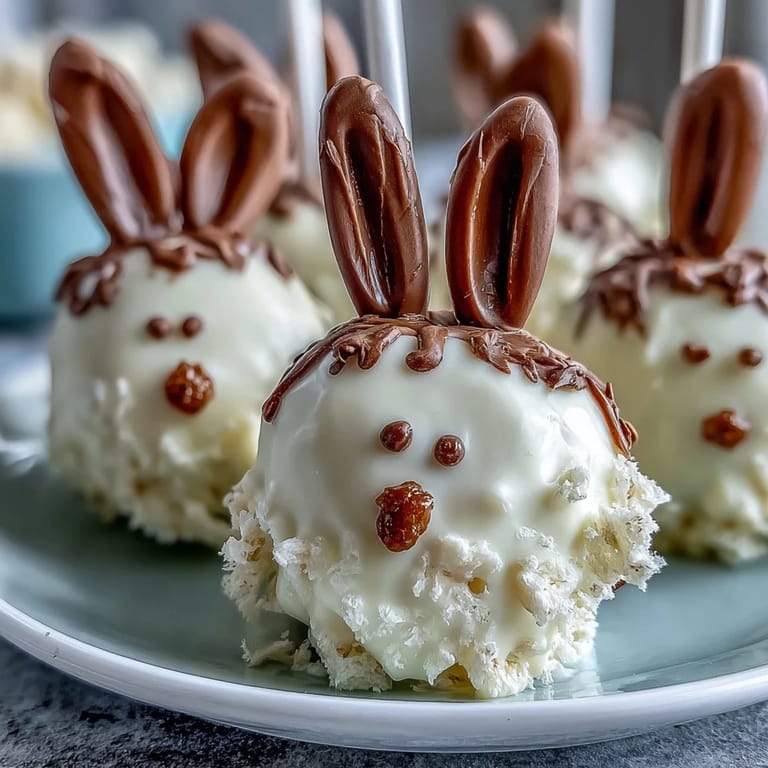
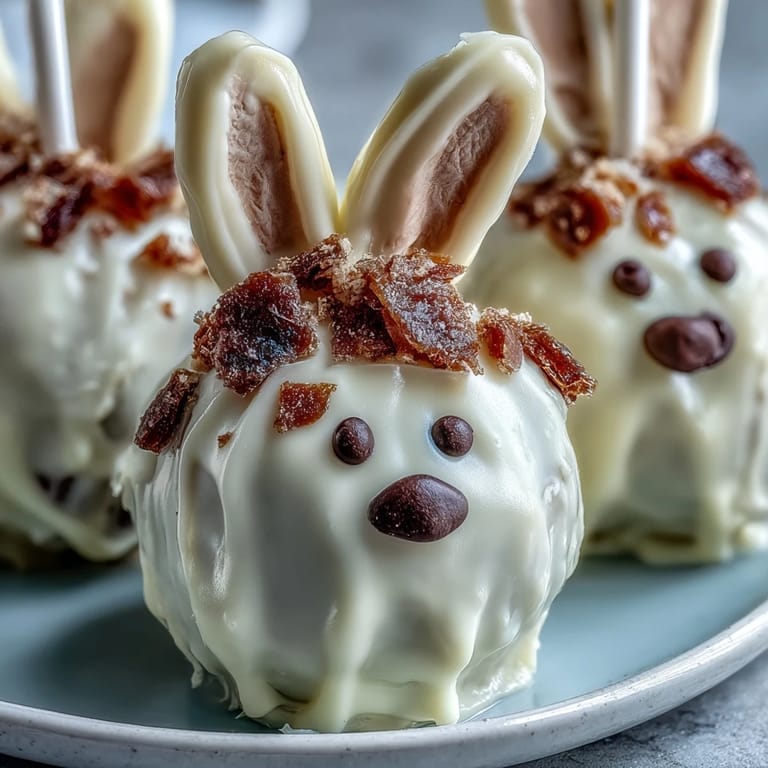
Save Easter celebrations call for treats that are as delightful to look at as they are to eat, and these Easter Bunny Cake Pops with White Chocolate Coating deliver on both fronts. Imagine adorable bunny-shaped cake pops, each one dipped in creamy white chocolate and decorated with charming candy details—pink ears, tiny noses, and fluffy marshmallow tails. These festive treats bring joy to spring gatherings, Easter egg hunts, and family celebrations, transforming simple cake and frosting into whimsical edible art that kids and adults alike will adore.
Save The beauty of these bunny cake pops lies in their versatility and charm. Starting with a simple vanilla or funfetti cake base, you'll transform crumbled cake mixed with cream cheese frosting into perfectly portioned balls that become bunny heads. The white chocolate coating creates a smooth, glossy finish that sets the stage for your creative decorations. Whether you use pink candy melts for ears, edible markers for whiskers, or pastel sprinkles for extra flair, each bunny can have its own personality. This recipe is perfect for both experienced bakers looking for a fun project and beginners ready to try their hand at cake pops.
Ingredients
Tired of Takeout? 🥡
Get 10 meals you can make faster than delivery arrives. Seriously.
One email. No spam. Unsubscribe anytime.
- Cake: 1 box (about 400 g) vanilla or funfetti cake mix (or homemade equivalent), plus ingredients required for cake mix (usually eggs, oil, water as specified on box)
- Frosting: 100 g (about 1/2 cup) cream cheese, softened; 60 g (about 1/4 cup) unsalted butter, softened; 120 g (1 cup) powdered sugar; 1/2 tsp vanilla extract
- Coating & Decoration: 400 g (14 oz) white chocolate melting wafers or candy melts; 24 lollipop sticks; pink candy melts or colored chocolate for ears and noses; edible black food marker or melted dark chocolate for eyes and whiskers; mini marshmallows (for tails, optional); rainbow sprinkles or pastel confetti (optional)
Instructions
- Step 1: Bake the Cake
- Preheat oven and bake the cake as directed on the box or by your homemade recipe. Let it cool completely.
- Step 2: Prepare the Frosting
- In a medium bowl, beat together the cream cheese, butter, powdered sugar, and vanilla extract until smooth.
- Step 3: Mix Cake and Frosting
- Crumble the cooled cake into a large bowl, then mix in the frosting a little at a time until the mixture holds together and is moist but not soggy.
- Step 4: Shape the Bunny Heads
- Portion out 24 even pieces and roll each into a ball. Shape each ball into a slight oval for the bunny head.
- Step 5: Freeze the Cake Balls
- Place cake balls on a baking sheet lined with parchment paper and freeze for 20 minutes.
- Step 6: Melt the White Chocolate
- Melt white chocolate wafers according to package instructions.
- Step 7: Insert the Sticks
- Dip the tip of each lollipop stick into the melted chocolate, then insert halfway into each cake ball (this helps secure the stick).
- Step 8: Coat with White Chocolate
- Dip each cake pop into the melted white chocolate, gently tapping off excess. Place upright in a styrofoam block or cake pop stand to set.
- Step 9: Add Ears and Tails
- While the coating is still wet, attach pink candy melts or colored chocolate for ears (cut into ear shapes if needed). Add a small piece of mini marshmallow for the tail.
- Step 10: Draw Faces
- Once set, use an edible marker or melted dark chocolate to draw eyes and whiskers. Use pink candy or chocolate for the nose. Add sprinkles or confetti as desired.
- Step 11: Let Set
- Allow cake pops to fully set before serving.
Zusatztipps für die Zubereitung
To make bunny ears, cut pink candy melts or use piped colored chocolate on wax paper and let harden before attaching. This ensures the ears hold their shape and stay secure on the cake pops. When mixing the cake and frosting, add the frosting gradually—you want the mixture to be moist enough to hold together but not so wet that it becomes mushy. If the mixture is too dry, add a bit more frosting; if too wet, add more cake crumbs. Freezing the cake balls before dipping is crucial, as it prevents them from falling apart when coated in warm chocolate. Work with one or two cake pops at a time to ensure the chocolate doesn't set before you add decorations.
Varianten und Anpassungen
For a gluten-free version, use gluten-free cake mix and ensure all decorations are gluten-free. You can also make these bunny cake pops with chocolate cake and dark chocolate coating for a richer flavor profile. Try different colored candy melts for the ears and noses—pastel yellow, lavender, or baby blue create beautiful spring variations. For a nut-free version, carefully check all ingredient labels, especially the cake mix and candy melts. If you prefer homemade cake over boxed mix, use your favorite vanilla or funfetti cake recipe and adjust the frosting amount as needed. Add food coloring to the white chocolate for tinted bunnies, or use different sprinkle colors to match your party theme.
Serviervorschläge
Display these Easter Bunny Cake Pops on a styrofoam block covered with pastel tissue paper or arrange them in a basket filled with Easter grass for a festive presentation. They make wonderful party favors when individually wrapped in clear cellophane bags tied with colorful ribbons. Serve alongside other Easter treats like decorated sugar cookies, carrot cake cupcakes, or pastel macarons for a complete dessert table. These cake pops also work beautifully as place settings—attach a name tag to each stick for a personalized touch. Store cake pops in an airtight container in the refrigerator for up to 4 days, bringing them to room temperature about 15 minutes before serving for the best texture and flavor.
 Save
Save These Easter Bunny Cake Pops with White Chocolate Coating are more than just a dessert—they're a celebration of spring, creativity, and the joy of sharing homemade treats with loved ones. Whether you're preparing them for an Easter brunch, a spring birthday party, or simply as a fun weekend baking project with your children, these adorable bunny cake pops are sure to bring smiles and delight. With their creamy interior, smooth chocolate coating, and charming decorations, they capture the whimsy and sweetness of the season in every bite.
Recipe FAQs
- → What cake flavors work best for these treats?
Vanilla or funfetti cake mixes are ideal to provide a light, sweet base that complements the white chocolate coating and decorations.
- → How do I shape the bunny ears?
Use pink candy melts or colored chocolate, pipe or cut out ear shapes on parchment paper, allow them to harden, then attach to the coated balls.
- → Can these treats be stored ahead of time?
Yes. Store them in an airtight container in the refrigerator for up to 4 days to maintain freshness and texture.
- → What alternatives exist for decorating the eyes and whiskers?
Use an edible black food marker or melted dark chocolate applied carefully to create facial details.
- → Is it possible to make a gluten-free version?
Absolutely. Use gluten-free cake mix and confirm that all decorations and coatings are gluten-free.
- → How long should the cake pops be frozen before coating?
Freeze the shaped balls for about 20 minutes to ensure they hold together well when dipping in white chocolate.